29 Tips and Tricks to Speed Up Windows 10 [Ultimate Guide]

![29 Tips and Tricks to Speed Up Windows 10 [Ultimate Guide]](https://internetsecuritycentral.com/wp-content/uploads/2018/03/heidi-sandstrom-362642-unsplash-1024x683.jpg)
PC hardware capabilities are ever increasing, the latest and greatest hardware demands powerful software to go with it. Microsoft Windows 10 offers exactly that.
Windows 10 is the latest in Microsofts operating system line and it does not disappoint when it comes to powerful features. Unfortunately, some of the new, powerful and fancy looking features of Windows 10 demand more resources than previous offerings. This can lead to decreased responsiveness or perceived performance when you are using your PC or laptop!
With this Ultimate Guide, we try to offer a wide selection of options to improve the performance of your Windows 10 machine. Not all options directly relate to Windows 10 but they are all aimed at increasing your overall desktop performance.
Whether you are trying to get the last bit of performance out of an old PC/Laptop, or simply trying to make your shiny new desktop perform even faster, many of the tips and tricks here on in should improve your Windows 10 experience.
The vast majority of our tips and tricks are free, there will be some money conscious options provided towards the end which offer a significant speed boost to your Windows 10 experience.
1. Clean Hardware
Our first suggestion is not a setting on your PC! A large majority of PCs or Laptops have decreased performance due to excessive heat. When your PC or Laptop gets too hot, most modern hardware is designed to decrease its power output and therefore decrease its thermal output.
The drastically decreased hardware speeds have a direct impact on your Windows 10 performance. A processor running at half speed is going to struggle to operate Windows 10 efficiently with multiple applications open.
For laptops, our suggestions are as follows
- Never put your laptop on a soft surface during use. This often results in air vents being covered which increase temperatures.
- Turn off your laptop – Grab a can of compressed air and blow dust out of any visible ventilation holes. Make sure you do this outside or in a well-ventilated area as a surprising amount of dust can come out
For Desktop Users we have these suggestions
- Turn off your desktop
- Carefully open the side of your case
- Grab a can of compressed air and direct it into the processor fan
- Manually clean (with the compressed air) the dust from any intake or extraction fans in your case.
- If your computer has a graphics card fan, give that a blast with the compressed air also.
By keeping your Windows 10 machines in a cleaner environment and performing some careful dusting every so often, you can ensure that your device is running at its full potential at all times with no thermal throttling.
2. Performance Mode
If your Windows 10 is seemingly slow, checking your computer’s performance mode is the first thing you should do. Windows 10 has a selection of power settings available from Power Saver for laptops through to high performance for plugged in/desktops.
Making sure you are in the appropriate setting (High performance for maximum speed!) is important to improving your Windows 10 experience.
To check your current power settings follow these steps
- Windows Key or Start Button
- Type “Choose a power plan”
- Select “Choose a power plan” option
- Select “High Performance” option
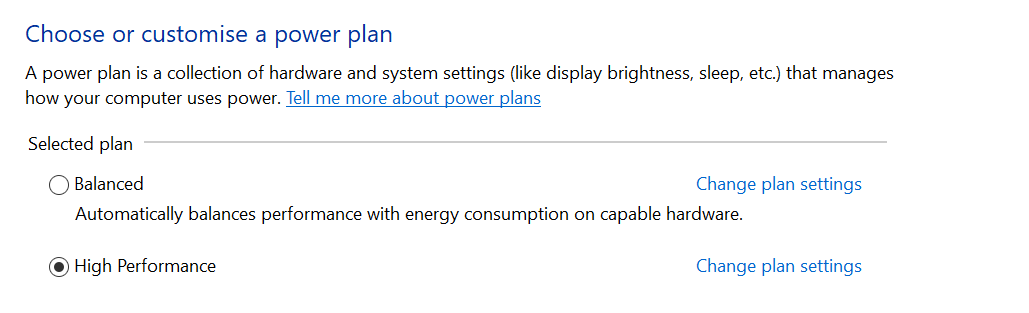
Your laptop/desktop will now run at full power at all times to increase responsiveness/overall performance in Windows 10.
If for some reason the “High Performance” option is not available to you, you can select the option to create a custom power plan and turn all options to maximum power.
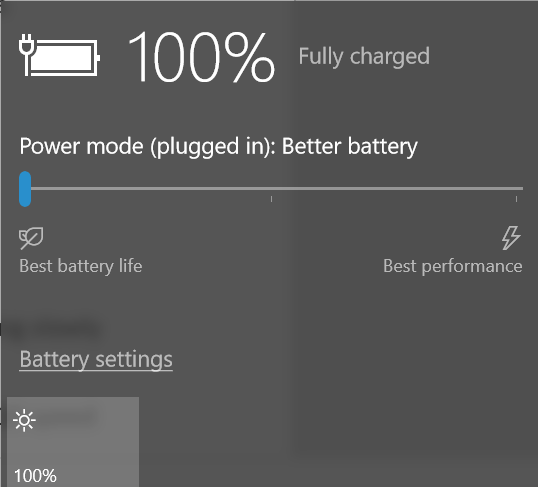
On a laptop, you can change power plan easily from the system tray with the following steps
- Click the battery icon
- Select “Best Performance” on the slider
3. Windows Troubleshooter (Automatic Maintenance)
The first tool you should utilize if your Windows 10 desktop is misbehaving or performing slowly is the built-in Windows Troubleshooter / Automatic Maintenance tool.
This tool runs through a standard maintenance checklist to ensure that your Windows 10 speed is optimal.
Although the Automatic Maintenance tool should be enabled by default, you can check that it is running correctly through by following these steps
Windows Key or Start Button
- Type “Settings”
- Select “Settings” option
- Type “Maintenance” in the search bar
- Select “Security and Maintenance”
- Click the downward arrow on the Maintenance heading
- Select “Start Maintenance” and enter your password
- The maintenance tool will now run
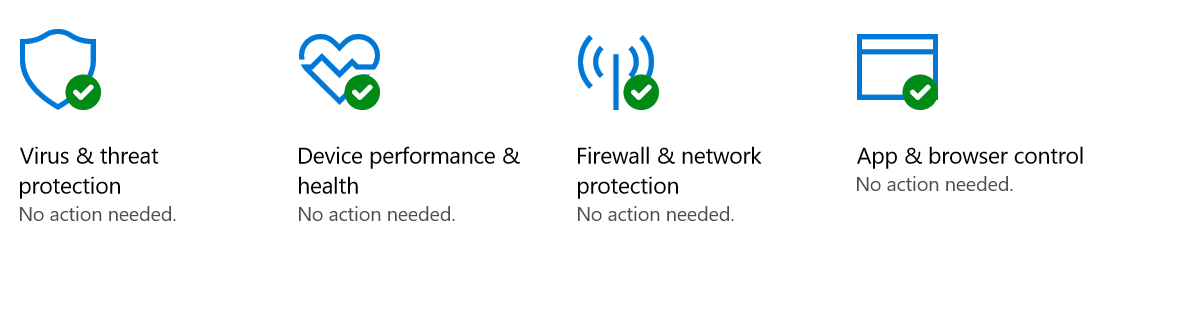
4. Windows Defender Security Center
The Windows Defender Security Center is Windows 10 built-in line of defense. This awesome suite has a bunch of tools and utilities to not only keep your Windows 10 device secure but also fast!
By making use of its 3 main components you go a long way to making sure that your Windows 10 pc or laptop is safe online, virus free and up to date!
Virus Scan
Running the Virus scan application on a regular basis will make sure that no nasty virus or malware applications have made it on to your system. The virus scan app comes with built-in real-time protection to ensure that you can’t easily install something bad on your Windows 10 device.
Windows Update
Keeping your Windows 10 installation up-to-date is vital to maintaining its speed. By having the latest and greatest security updates, as well as device driver updates, you can be sure that you are a step closer to a fast Windows 10 experience.
Firewall
The built-in Windows Defender Firewall is a solid line of defense against potential cyber attacks. In an ever increasingly connected world, making sure your device is safe from attacks is a great way to maintain excellent Windows 10 speed.
To access the Windows Defender Suite follow these steps
- Windows Key or Start Button
- Type “Windows Defender”
- Select “Windows Defender Security Center”
- Select “Open Windows Defender Security Center”
- Alternatively, you can select the Windows Defender Security Center from your system tray.
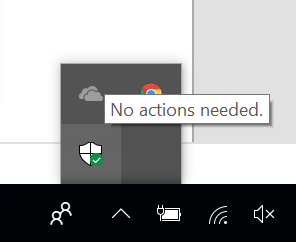
Hopefully, the overview screen shows you all green check marks. If not you can run any of the utilities by clicking on the relevant screen.
5. Update Drivers
A quick and easy tip to try and grab some extra speed for your Windows 10 device is to make sure your device drivers are up to date.
A driver is a small piece of software that allows your hardware to interact with software/Windows 10. Hardware manufacturers are constantly releasing new and better optimized drivers for the hardware to increase speeds.
The vast majority of your device driver updates will be covered within the windows update section above. However, some devices, such as graphics cards, have larger device driver suites that offer extra tools/speed.
If you go to the manufacturer’s website to grab a device driver suite, be careful not to install any extraneous bits of software or services that will negate any performance gain!
6. Error check drives
Through day to day activity, it is possible that your Windows 10 hard drive may become corrupted or damaged. Unfortunately, this is simply the nature of computer hardware!
These corrupt parts of your hard drive can cause your Windows 10 installation to slow down, hang up or even crash completely.
To check if your hard drive has any corruption you can use Windows 10 built-in tool for disk checking.
Follow these steps
- Windows Key or Start Button
- Type “This PC”
- Select “This PC”
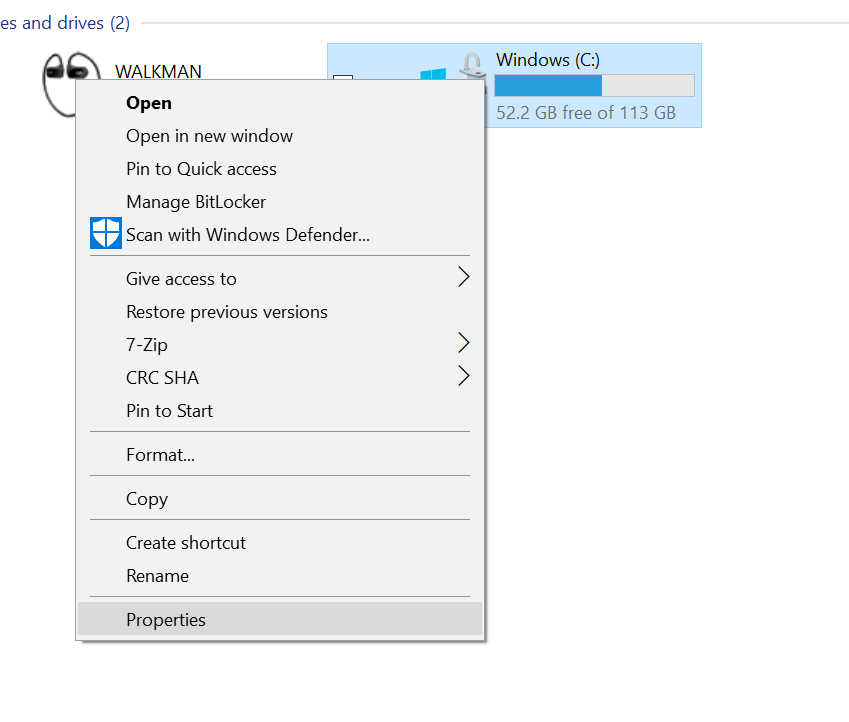
- Right-click your Windows hard drive
- Select “Properties”
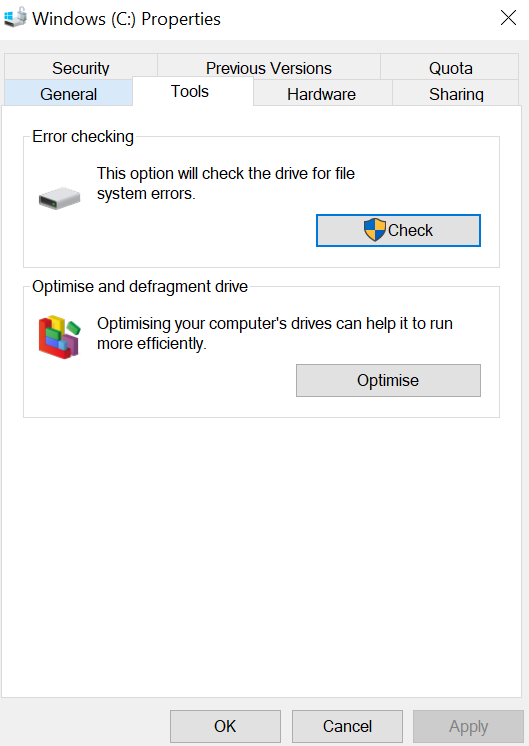
- Select “Tools”
- Select “Check” Under the Error Checking heading
- Follow the on-screen instructions to completion
With some luck, any corrupt sections of your hard drive will be recovered.
7. Remove Old or Unused applications
Over time your Windows 10 installation will gather a whole bunch of rarely used or extraneous applications.
Although they will have fairly low impact on your Windows 10 performance when not running, it is still possible for extra software to be taking up resources through background services or other update programs.
It is also possible that if you have Windows 10 installed on a small partition or hard drive/SSD that any extra programs will make your disk space critical.
To uninstall any unused or old applications follow these steps
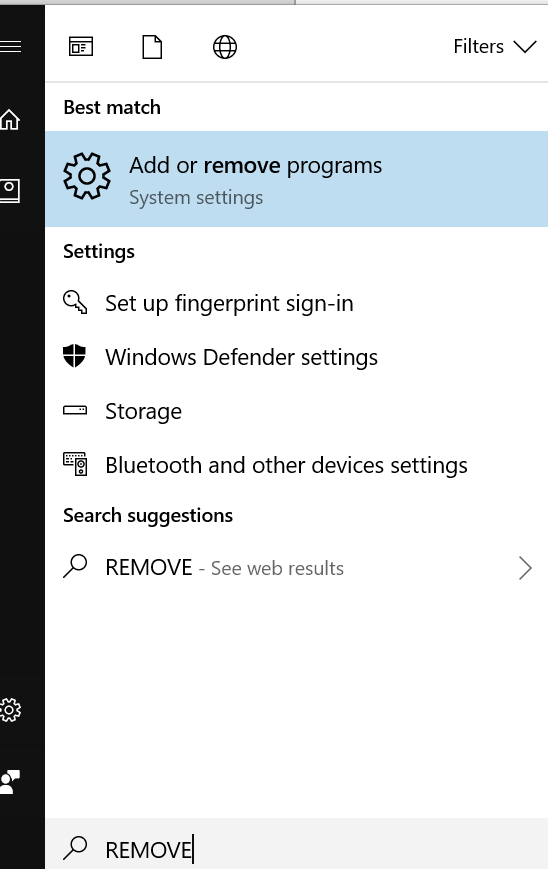
- Windows Key or Start Button
- Type “Remove”
- Select “Add or Remove Programs”
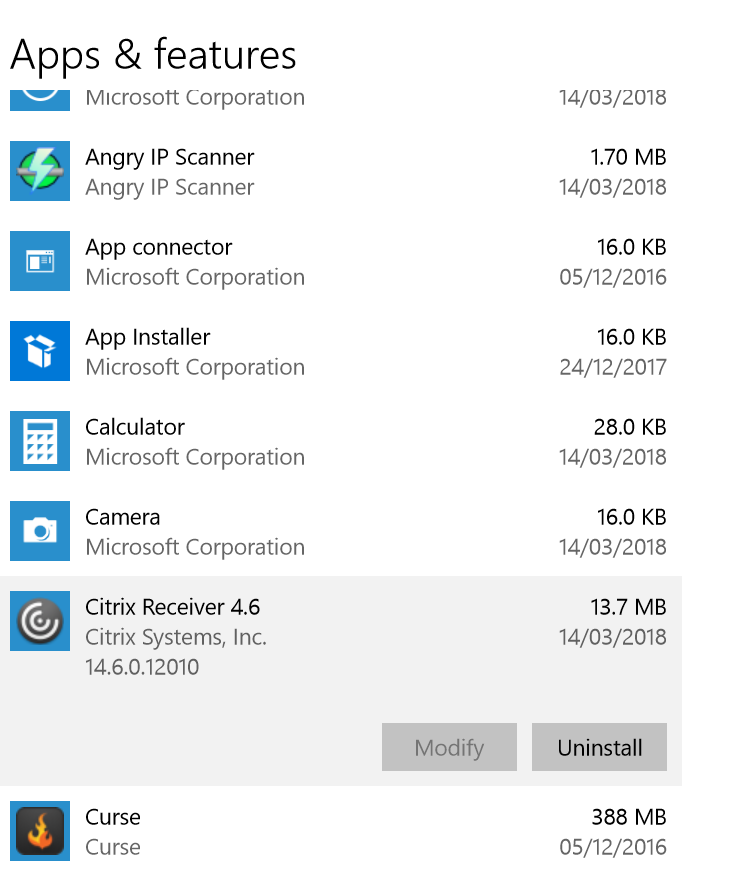
- Under the “Apps & Features” heading, select any program you wish to uninstall
- Select “Uninstall”
- Follow on-screen instructions until program is removed
8. Disable Start Up Applications
Along the same lines as old and unused applications, your Windows 10 installation will gather extra unneeded startup applications over time.
These small programs are assigned to open up when your Windows 10 is loading. Although on their own they will likely have a small impact, cumulatively they can slow down your Windows 10 loading speed and therefore affect overall performance.
To disable some startup applications follow these steps
- Windows Key or Start Button
- Type “Task Manager”
- Select “Task Manager”
- Select “Start-up”
- Right-click an application to disable
- Select “Disable” from the context menu
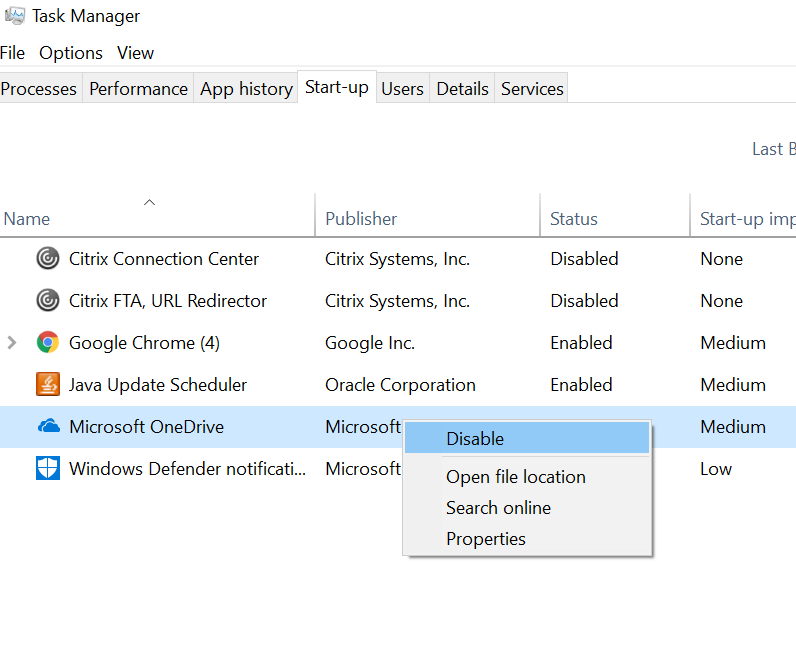
As you will be able to see, the task manager offers some insight into the startup time impact of each individual application. Prioritise disabling any extra startup applications, which you aren’t planning to use, that have a high or medium impact first.
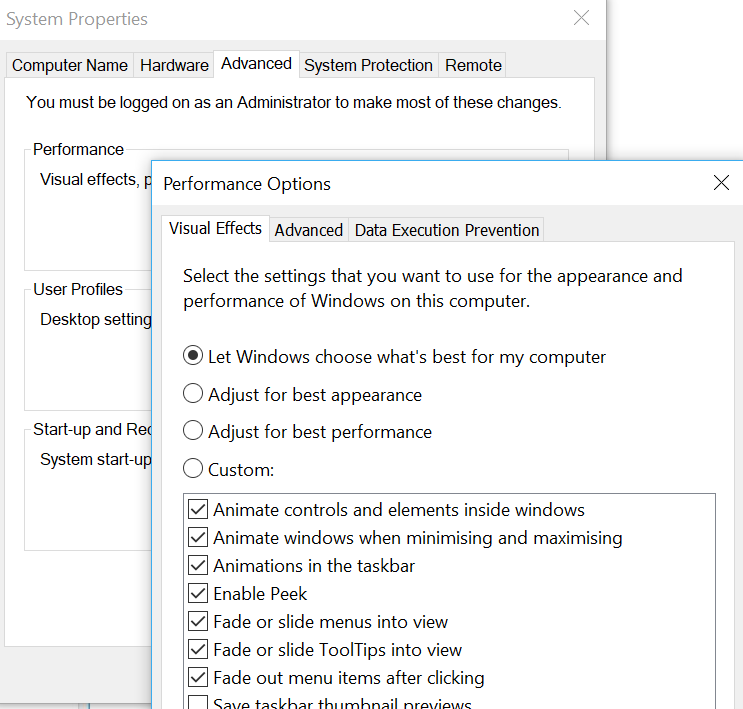
9. Disable Animations
Windows 10 has a vast selection of flashy effects and animations built in. These are pleasing to the eye and improve the visual impact of Windows 10, unfortunately, they do take up system resources unnecessarily.
If you don’t mind having a slightly less flashy interface for some faster Windows 10 performance then follow these steps
- Windows Key or Start Button
- Type “advanced system settings”
- Select “View Advanced System Settings”
- Enter your password if prompted
- Select “Settings” under the performance heading
- Select “Adjust for Best Performance”
- Apply/OK
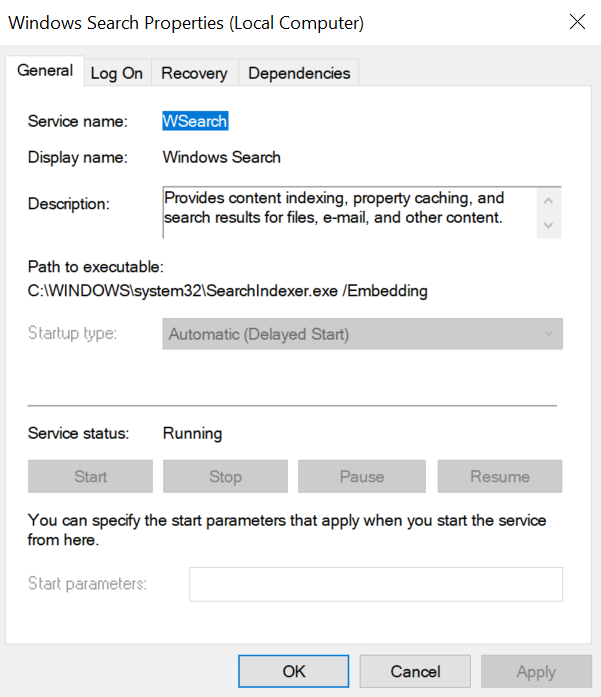
10. Disable Search Indexing
Search Indexing improves the speed at which your Windows 10 installation can return results from the search tool. It does this by processing all of the data on your pc or laptop to be searchable.
Although this has little impact on faster, newer devices, it can have a large impact on older Windows 10 machines.
To disable Search Indexing follow these steps
- Windows Key or Start Button
- Type “Services.msc”
- Select “Services” application
- Find “Windows Search” in the list of services
- Right click “Windows Search”
- Select “Properties” in the context menu
- Change Startup Type to either disabled or manual
- Apply/OK
Windows will no longer cache/index search results, freeing up a small number of resources to speed up Windows 10.
11. Clean up Disk
Following a similar train of thought to our removing old and unused application trick, the built-in Windows 10 disk clean up tool can free up vital disk space resources.
Over time your Windows 10 installation will accumulate extra temporary files for such things as windows updates or temporary browser related files.
These files, while small, take up precious resources on older machines that can be used to speed up Windows 10.
To run the disk clean up tool follow these steps
- Windows Key or Start Button
- Type “disk clean-up”
- Select “Disk Clean-Up” Application
- The tool will scan for relevant files to clean up
- Select any files that you want to remove
- Select “Clean up system files” and follow the on-screen instructions
12. Optimize your browser experience
The vast majority of perceived Windows 10 speed issues will begin with people browsing the internet. For most users, their browser is seen as an extension of their Windows installation.
Unfortunately, browsers can become bogged down through excessive extensions that hog large amounts of memory when in use.
By making sure you do not have too many extensions installed, or removing excessively high usage ones, you can speed up your Windows 10 perceived performance.
To disable extensions, follow these steps
For Chrome
- Open a new chrome tab
- Type “chrome://extensions/” and hit enter
- Select “remove” on any unneeded extensions
For Firefox (Add-ons)
- Click the Menu button
- Select Add-ons
- In the Add-ons Manager tab, select the Extensions or Themes panel.
- Select the Add-on you wish to disable
- Click the Disable button
It is recommended to restart your browser once you have disabled an extension/Add-on.
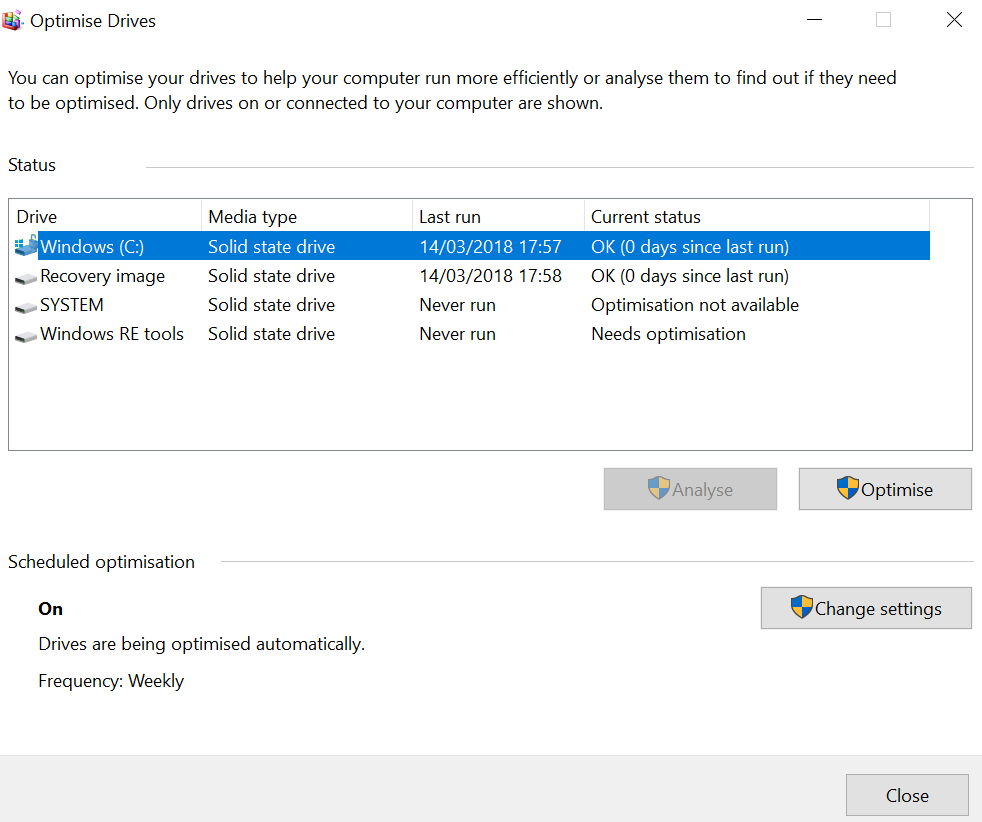
13. Defrag (not SSD)
Data fragmentation is still a problem for a large number of Windows 10 devices.
Having data scattered around is similar to a library having books thrown all over the floor. The information is all there, it is just increasingly difficult to locate!
The impact of fragmented data is not a huge one, but it is still worth using the built-in disk defragmentation tool on normal hard drives.
Do not run the defrag tool if you have an SSD in your desktop or laptop, see our section at the end of the article for the reasons why.
To run the Defrag tool follow these steps
- Windows key or Start Button
- Type “Defrag”
- Select “Defragment and Optimize Drives”
- Select “Analyze” on the hard drive
- Once a drive has been analyzed, Select “Optimize”
- Follow the on-screen instructions and wait.
14. Enable Hibernation
One way to speed up Windows 10 loading times is to not fully shut down your PC or Laptop after use.
By making use of the hibernation feature of Windows 10 you can resume your Windows 10 session from the state before your hibernated it.
To enable the hibernate option in your start menu follow these steps
- Windows Key or Start Button
- Type “Power”
- Select “Choose a Power Plan”
- Select “Choose what the Power Buttons do” in the left menu
- Scroll down and check “Hibernate” to show it in the start menu.
Enable Hibernation
15. Enable Fast Startup
If you aren’t a fan of the hibernate option, or you simply like to shut your PC down fully after every use, Windows 10 has a built-in fast startup feature that you can make use of.
Follow the same steps as the hibernate tip above but instead make sure to select “Turn on fast startup” in the menu.
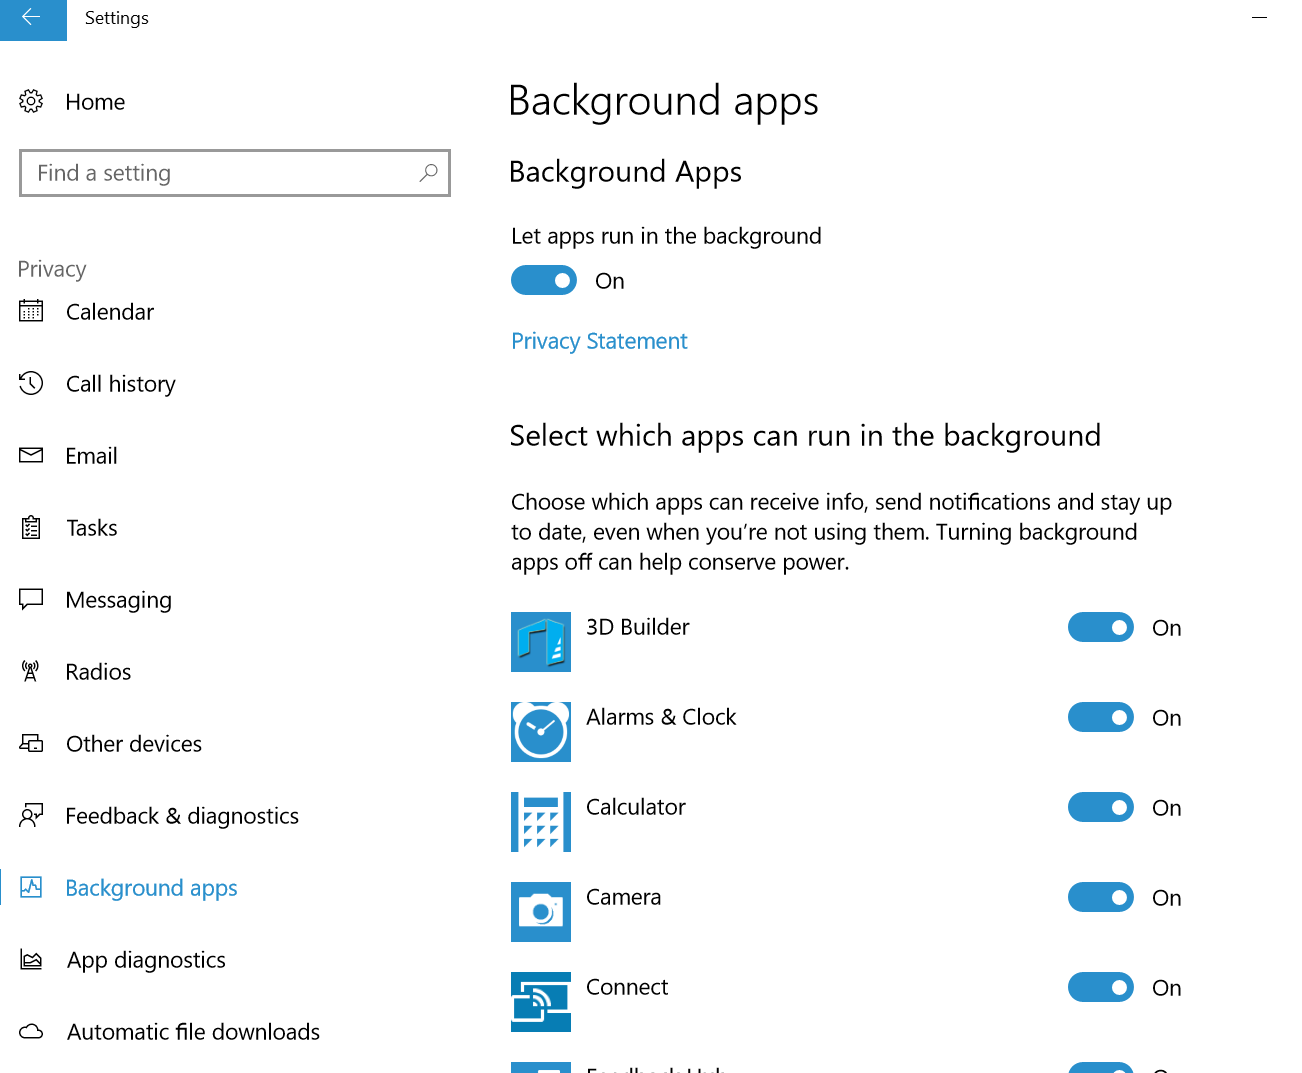
16. Disable Background Apps
Background Apps are similar to system services, they sit in the background as their name suggests so that they are ready for use at a moments notice.
The majority of background apps use very little resources so it is likely only worth disabling any you really don’t use.
If you are on a very old system it is probably worth turning background apps off completely to maximize your available resources.
To disable background apps (individually or entirely) follow these steps
- Windows Key or Start Button
- Type “Background”
- Select “Choose which apps can run in the background”
- Toggle individual applications in the list off, or toggle off background apps entirely
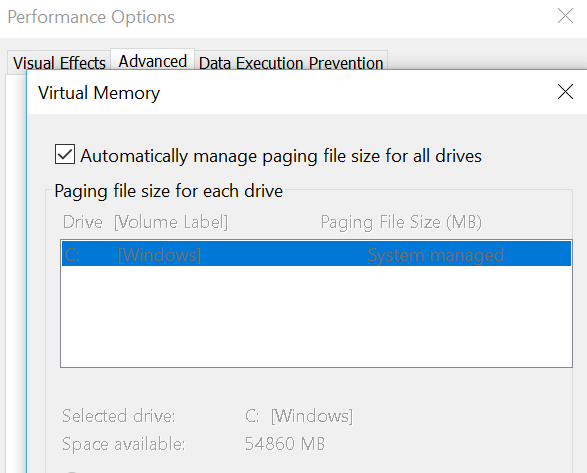
17. Optimize Virtual Memory (Pagefile)
If your Windows 10 desktop or laptop has a small amount of RAM, it is worth making modifications to the virtual memory (page file) allocation.
Virtual Memory is an assigned area of your hard drive that will act like RAM in a pinch. Although it is massively slower than real RAM, it is important to have an optimized allocation size so that you never get truly stuck.
The Virtual Memory allocation is automatically handled by Windows 10, however, making a manual adjustment can improve its performance.
To change your virtual memory allocation settings, follow these steps
- Windows Key or Start Button
- Type “Control Panel”
- Open “Control Panel”
- Select “System and Security”
- Select “System”
- Select “Advanced System Settings” in the left menu
- Enter your password if prompted
- Select “Settings” under the performance heading
- Select “Advanced” at the top
- Select “Change” under the virtual memory heading
- Uncheck “Automatically manage paging file size for all drives”
- Check the “Custom Size” radio button
- Enter an amount that is double that of your system RAM (e.g. 4GB – 4000MB – would require you to enter 8000MB)
- Select “Set”
- OK
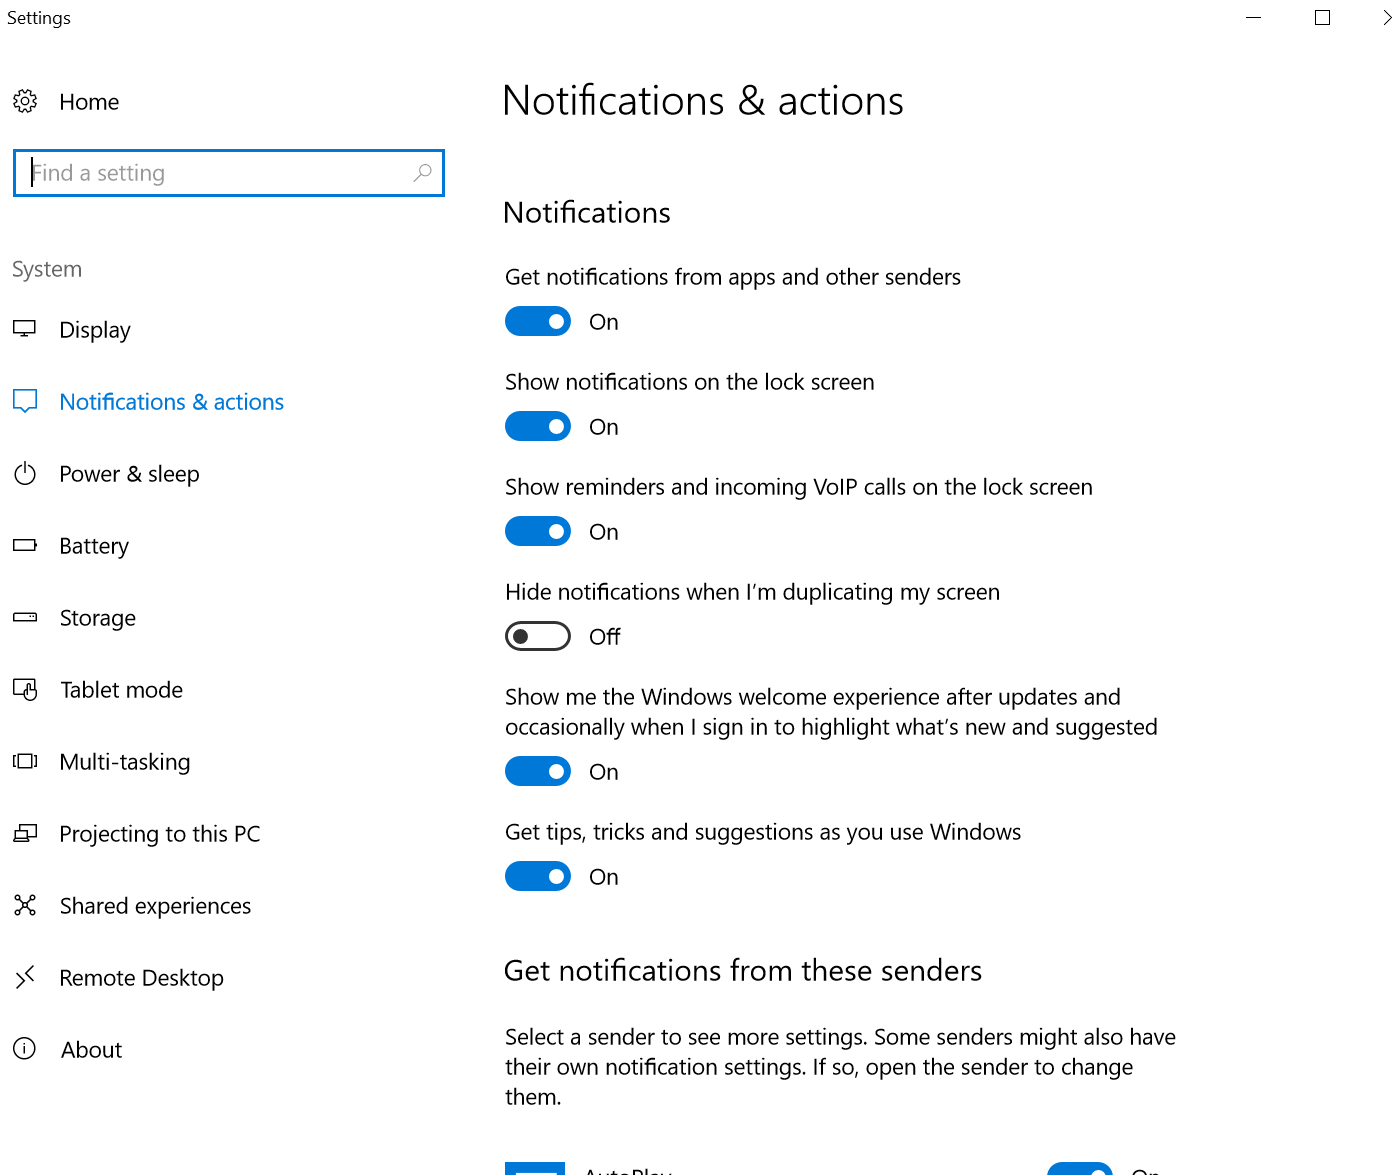
18. Disable Windows Tips
If you aren’t a complete novice to Windows options then you should be able to safely disregard and disable the Windows 10 tips option.
Tips are highlighted pieces of advice offered by Windows to help brand new users not accidentally modify/disable something they shouldn’t.
To disable Windows Tips follow these steps
- Windows Key or Start Button
- Type “Notifications & actions settings”
- Select “Notifications & actions settings”
- Toggle off “Get Tips, Tricks and Suggestions as you use Windows”
- You can also disable other individual programs from notifying you with tips from this options screen.
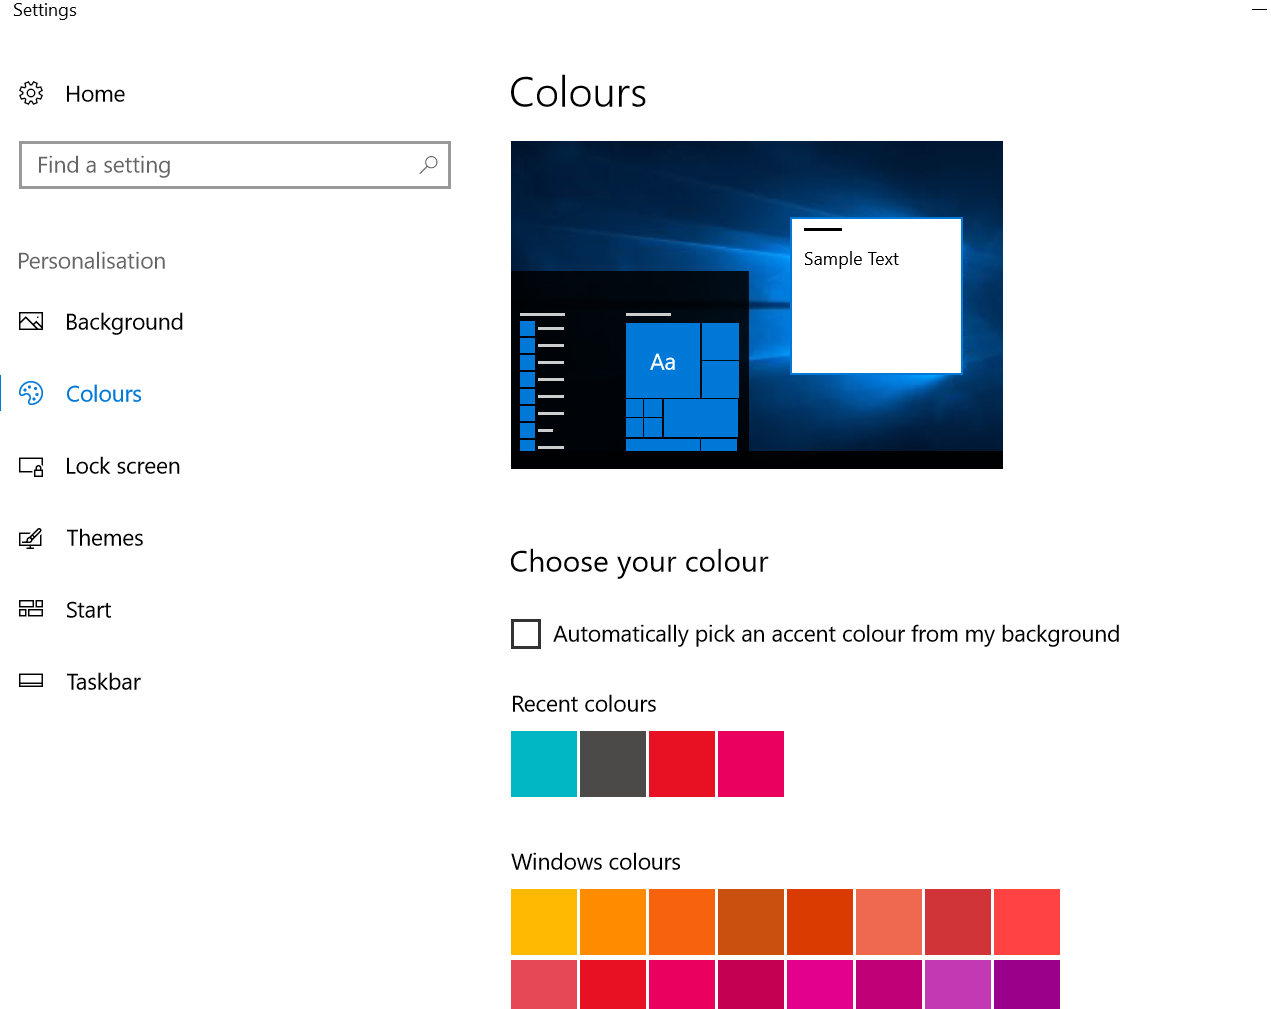
19. Turn off Dynamic Color Adaption
A small resource gain can be made by disabling a fancy desktop feature offering from Windows 10.
Color adaption allows Windows to automatically take a color from your desktop and altering your Windows theme to go along with it.
To disable this option follow these steps
- Windows Key or Start Button
- Type “Color Settings”
- Select “Color Settings”
- Toggle “Automatically pick an accent color from my background” option off
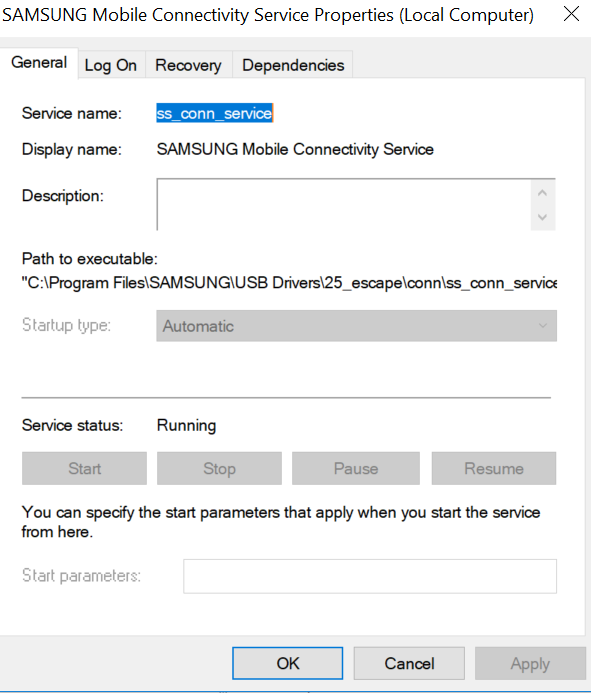
20. Disable Background Services
Whenever you turn on your PC, Windows will automatically load a plethora of services in the background. Services are small programs that perform small tasks in the background.
Some services simply lie in wait until you need to run a piece of software, such as quickstart for Adobe or Office. Unfortunately, these services do use resources – So if you don’t use a piece of software that is running a background service often – it is worth disabling it.
Example services to disable would be jqs.exe – Java Quick Start, reader_sl.exe – Adobe Acrobat speed launcher and OSA.exe/soffice.exe for Microsoft and OpenOffice packages.
To disable a service follow these steps
- Windows Key or Start Button
- Type “services.msc”
- Select “Services” application
- Find the service you wish to disable
- Double click the service
- Change the Startup Type option to “Disabled” or “Manual”
- Select Apply/OK
21. CCleaner
CCleaner is a free piece of software (with a paid pro version) that offers a number of features to increase the speed and security of your PC.
Although we previously used the disk clean up tool to get rid of lots of unused files on our machine, CCleaner goes an extra step to remove unnecessary data.
To use CCleaner follow these steps
- Go to https://www.ccleaner.com/ccleaner and download either the free or pro version of CCleaner
- Follow the installation instructions provided by CCleaner
- Launch CCleaner from your start menu (Windows Key or Start Button – CCleaner)
- Select the Cleaner Icon on the left
- Select Analyze options
- Select Run Cleaner to remove unused files
22. Clean up your Registry
The Windows registry is a database of low-level settings for both Windows and the applications installed on your PC.
Over time, as you add and remove software, the registry can end up with unnecessary or broken registry entries. To eliminate these from potentially causing performance issues on your PC you can use CCleaner again.
It is recommended to do a backup of your registry before modifying anything, fortunately, CCleaner offers this option during the registry clean up procedure.
To use CCLeaner to fix your registry follow these steps
- Windows Key or Start Button
- Type “CCLeaner”
- Select “CCLeaner” application
- Select the registry icon on the left
- Select “Scan for issues”
- Select “Fix Selected issues” after selecting the issues it highlights.
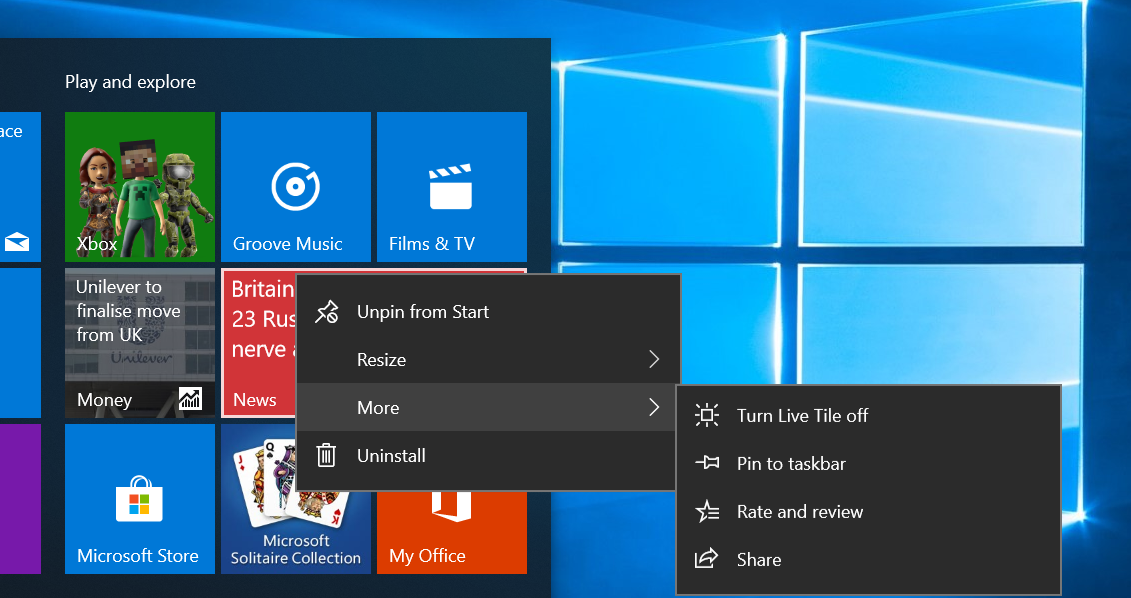
23. Disable Live Tile
Live tiles are a feature in the Windows 10 start menu. They are auto-updating “live” tiles that can offer many things such as Twitter and news updates. If, however, you aren’t making use of them or you are looking to free up resources, you can easily disable them.
To disable a live tile follow these steps
- Windows Key or Start Button
- Right-click the Live tile you wish to disable
- Select “More” on the context menu
- Select “Turn Live Tile off” from the context menu
The live tile is now disabled.
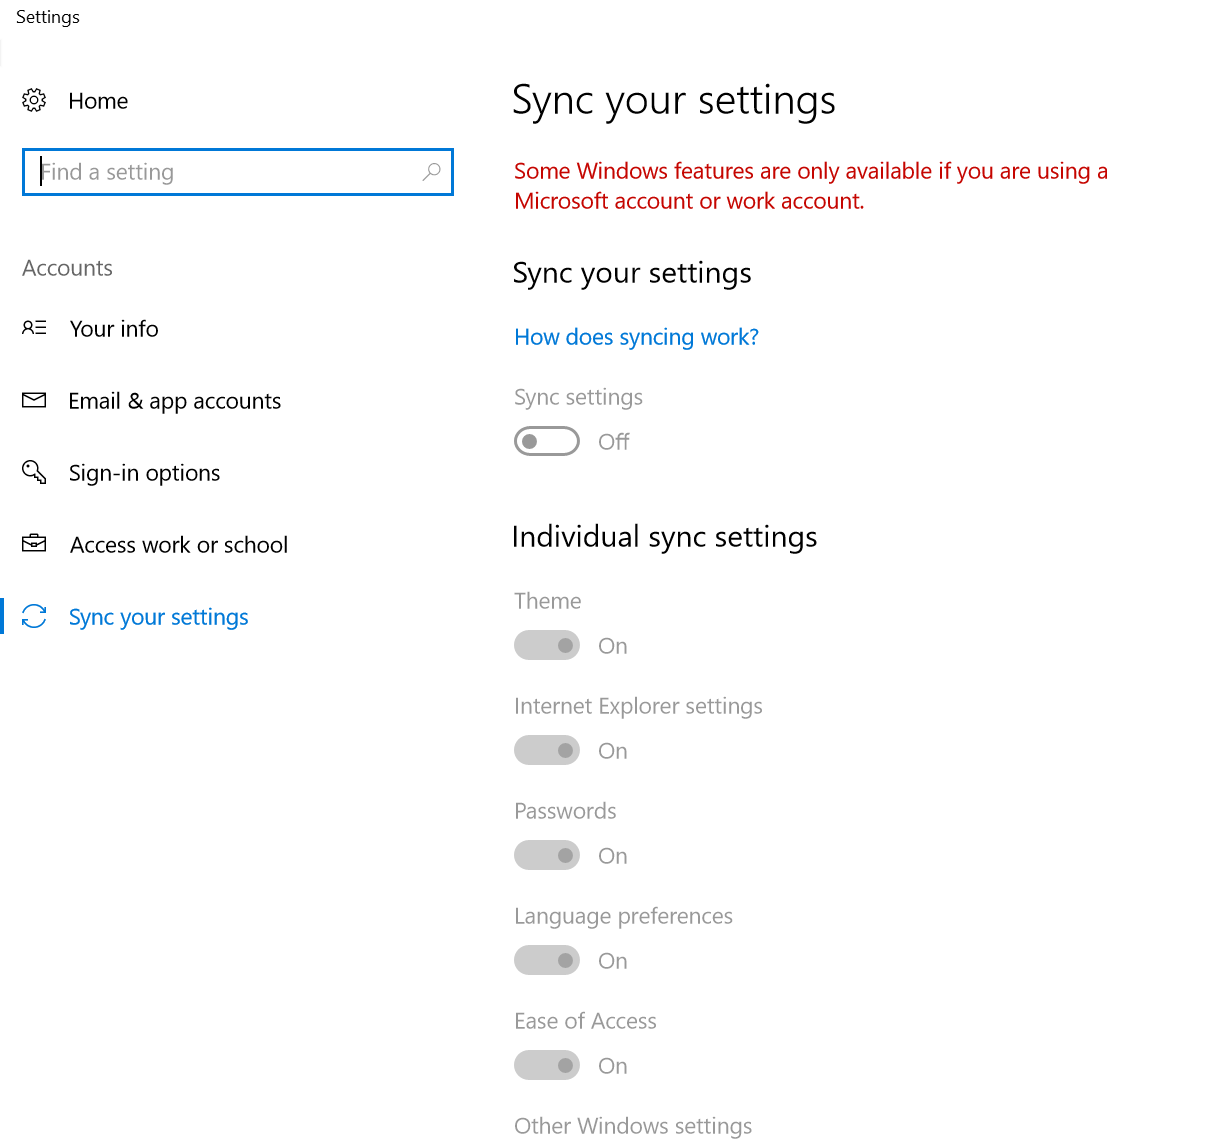
24. Disable Sync
One great feature of Windows 10 is its ability to sync a whole bunch of important things across devices such as passwords, system settings, browser settings.
Unfortunately, this syncing process can use up vital resources that you may want to use elsewhere!
To disable syncing follow these steps
- Windows Key or Start Button
- Type “Sync your settings”
- Open “Sync your settings”
- Turn Sync settings toggle to off.
Although this is likely to only give a tiny increase in performance, if you aren’t making use of the sync option then it is resources/bandwidth saved.
25. ReadyBoost USB 3.0 drive
A handy option if you have a spare USB 3.0 pen drive (or at least a chunk of space on one!).
Windows 10 offers users a feature that allows you to make use of space on a removable storage device as a supplement to your memory (RAM).
This option is only really of value if your removable storage device is faster than your hard drive, so if you have an SSD or lots of RAM already then it isn’t worth trying.
It is recommended to use only a USB 3.0 drive due to the increased speed.
If you want to try it out, follow these steps
- Insert USB 3.0 removable storage device
- Windows Key or Start Button
- Type “This PC”
- Open “This PC”
- Right-click USB device
- Select Properties
- Select either “Use this Device” (and select a storage amount) or “Dedicate this device” if you do not plan on storing anything on the USB storage.
- OK – Windows will now configure your USB device to use with ReadyBoost
26. Reset nuke it
Our final free option!
If your computer came pre-built/pre-installed then Windows 10 has a handy “reset/recover” option built in.
This is a final solution if your Windows 10 performance problems just don’t seem to be going away.
To access the recovery menu
- Windows Key or Start Button
- Type “Recovery”
- Select “Recovery Options”
- Select “Get Started” and follow the prompts.
Reset Options in Windows 10By choosing this option you will return your PC to the Windows state from when you purchased it. You will likely benefit from following the previously stated steps of removing bloatware and disabling some background processes after you have reset.
27. Install SSD
Although not a free option, installing an SSD into your desktop or laptop can offer massive speed increases. Startup times, application loading and all-around performance will be sped up by switching away from the much slower mechanical hard drive.
If you do install an SSD you can disregard the tip to defragment your hard drive as this isn’t required. In fact, it can harm your SSD by using program/erase cycles that are technically limited due to the way SSDs work.
28. Install More/Faster Memory (RAM)
Another paid option is to equip your laptop or desktop with faster/more RAM. By doing so you will be less reliant on the pagefile/virtual memory/Readyboost options.
Be careful to check what type of memory your computer takes along with the maximum capacity.
There are several free tools online to check this for you such as Crucials compatible memory advisor – http://www.crucial.com/usa/en/advisor
RAM is unfortunately fairly expensive as of the time of writing this article so this is one of the last options we would take!
29. Performance Monitor
Once you have followed the tips and tricks applicable to you – and maybe splashed out on some hardware upgrades – you can easily monitor your computer’s performance in Windows 10.
To access the performance monitor follow these steps
- Right-click your taskbar
- Select “Task Manager” from the context menu
- Select “More Details” at the bottom left of the task manager
- Select the Performance tab at the top of the task manager
You will now be greeted with an overview of performance for many aspects of your PC – CPU, Memory, Hard drive, Wifi, and Graphics card. These overviews will allow you to “keep an eye on things” in regards to your PCs performance.
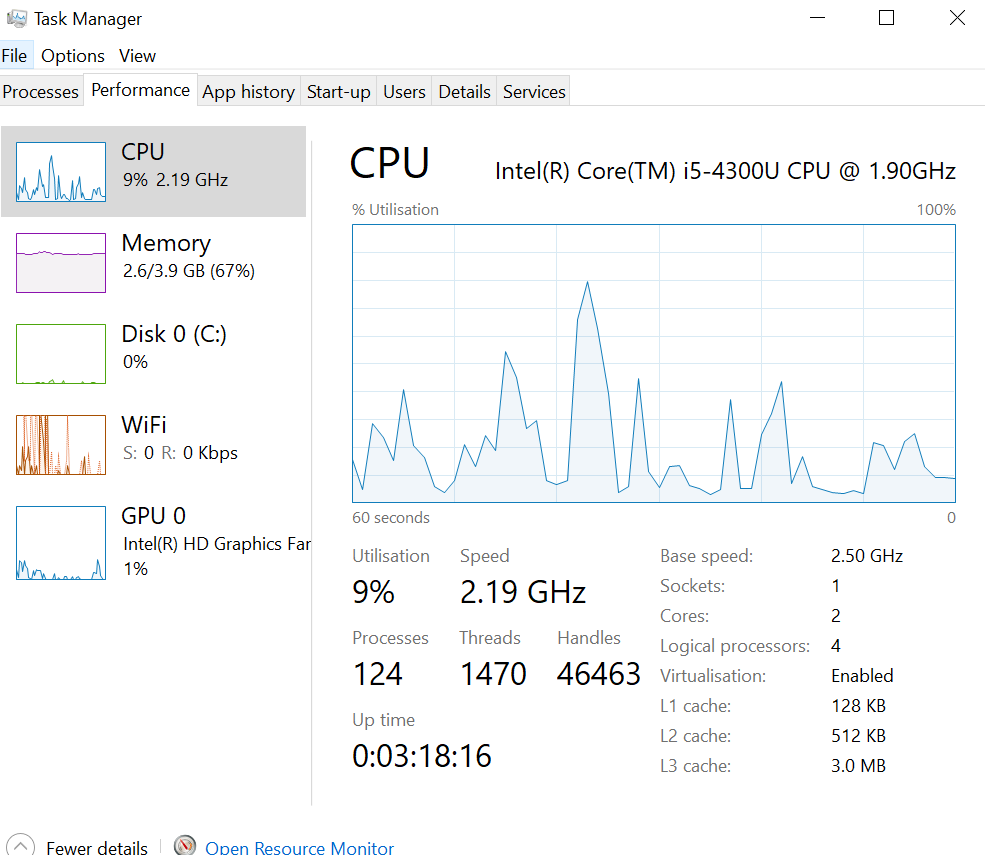
Any irregularities such as hugely increased CPU or Memory usage should be easy to spot with the performance monitor allowing you to take action.
If something is hogging resources, you can find the culprit by selecting the processes tab and then the relevant subheading (CPU, Memory etc). This will order the currently running processes on your machine by their usage. If something is hogging way too many resources it should easily stand out!
Hopefully this guide has helped speed up Windows 10 on your PC/Laptop!
Please check out our other guides for more advice on keeping your computer safe and secure online.
Be the first to write a comment.